So, believe it or not, I've had this a-line skirt hanging out in my closet since I made it one weekend in high school. It was cute, but not that flattering and I didn't bother to put in a closure, so I had to put it on over my head. I hadn't worn it in at least a year because of all of these reasons, and I decided it was either time to make it cute enough to wear, or throw it out. So, here's my tutorial on A-line to Pencil. (Sorry for the fuzzy photos - my camera is broken so I'm using my smart phone!)
 |
| Before |
 |
| After |
Sewing Level: Intermediate to Advanced
Time: 1 - 2 hours depending on complexity of your own skirt and how fast you sew.
Supplies and Materials:
A-line skirt
Cover-alls or similar large metal zipper (something you like the look of)
Sewing machine and standard notions
Scissors
Ruler
Fabric for waistband (if your skirt doesn't have one, or if you want to add some pop color)
Button for the waistband (again, if your skirt doesn't have one)
Seam ripper (optional)
Chalk pencil (optional)
Hip curve (optional)
 |
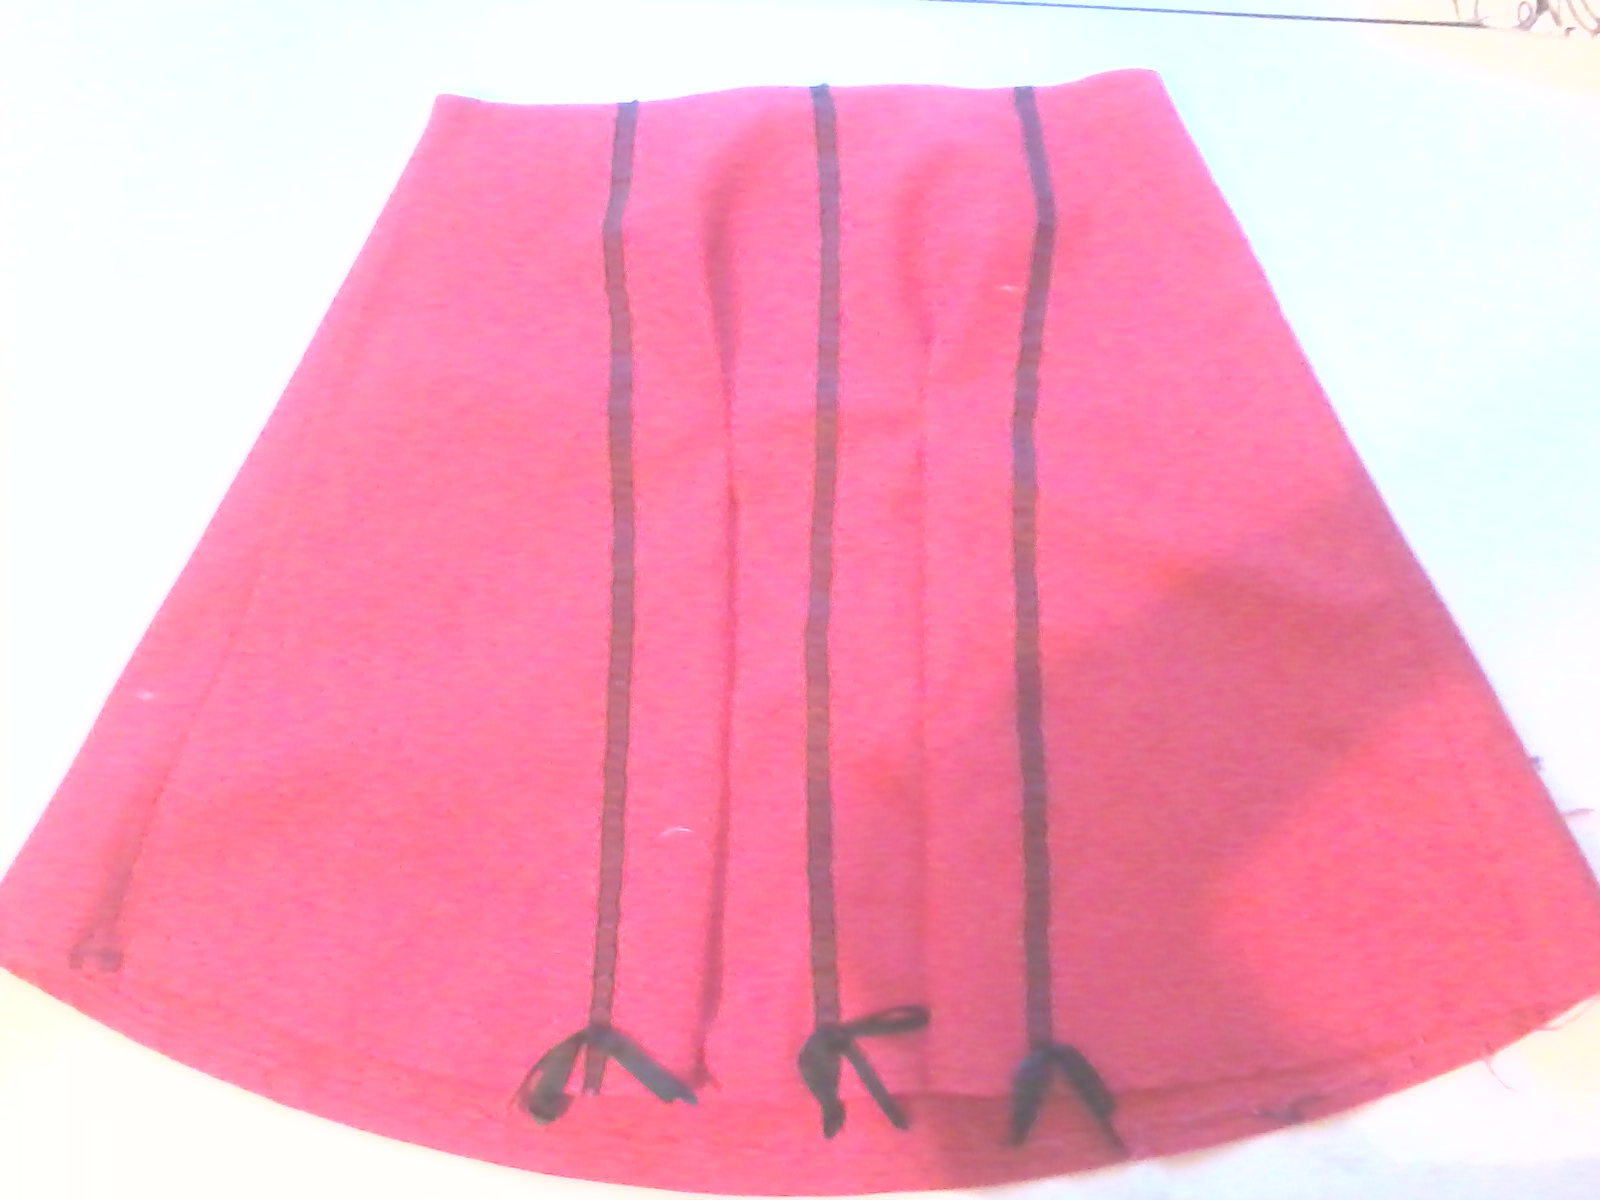
| Here is the skirt laid out on the table. Notice that the ribbons follow the a-line angle of the skirt. Your skirt may have similar details, whether it is the pattern on the fabric, or just some seaming. This won't look good if we just sew up the sides, so we need to bring these lines to be parallel. If you have a waistband on your skirt, you will probably want to take it off with a seam ripper before starting. |
 |
| So, measure and find the center between the lines (if you have a patterned fabric, just choose two lines equidistant from the center line), and pin the fabric, taking in darts so that the lines become parallel. If your skirt has seaming, your best bet is to open those seams and cut the fabric into rectangles and then sew them back together, making the seam lines parallel. |
 |
| Sew your darts, ending at the waist line (in this photo I only sewed up to the hip line, but I later decided it did not look good to have pleats there - I would advise to just make darts up to the waist line). Turn the skirt inside out and press the darts over their respective center lines. |
 |
| Now to the back. Fold your skirt in half so that you can find your center line in back. If you have a zipper or button here already, it will make it easier. Cut open the skirt all the way from the hemline to the waist line. If you have a seam up the back already, just take out the seam with a seam ripper. |
 |
| Sew the first side of your zipper to one side of the skirt. Notice that there are two lines of stitches. The first, closer to the zipper, secures the zipper to the skirt. The second is sewn on the right side of the skirt and secures the edge of the zipper tape so that it does not pull away from the skirt. You'll also want to make sure that the closed end of the zipper is at the bottom and the end that opens is at the top. If your zipper is longer than your skirt, which mine was, leave the excess at the top. You'll cut it off before you put on the waistband, which will secure it. |
 |
| Fold your zipper tape over the edge of your hem and secure with a few stitches. |
 |
| Now try on your skir and see how it's going. Make sure you like the front so far. Then put it on inside out and, keeping the zipper at your center back, pull the excess fabric to the side of your legs. Your original side seam will be closer to the front, so don't try to pull equally on either side of it. Just pull it to what is now the natural side seam. Don't take in too much fabric at this point that it creates stress lines; we will take in the rest of the excess with two more darts in the back. Put a pin at the hem and at your hip, and one or two in between. |
 |
| Take off the skirt and mark the pins with some chalk. Take out the pins and lay the skirt out flat so that there is equal excess on both side seams. You'll notice that pin marks on the front and back of the skirt don't exactly align. Transfer the front pin marks to the back so that you can compare the differences. |
 |
| Using a hip curve if you have one, draw a line that comes from the original side seam at the waist line to the hemline, going between your two sets of pin marks as best you can. Make sure that your original side seam is always included in the excess (the part you'll eventually cut off), if not, you will end up with two side seams in some parts. Measure and make the same line on the other side seam. Sew up both sides and try on the skirt again. |
 |
| At this point, the skirt should fit pretty well, but just have some excess around the back of your legs (under your buttocks). Try on the skirt and pin the excess between the side seam and the zipper in the back (just mark one side) with one pin at the hemline and one part just below the widest part of your buttocks. Take the skirt off and mark an s-curve from the pin at the hemline to the upper pin, and up until the line hits the edge of the fold (to make a closed dart). Measure your curve from the zipper, and then from your side seam and mark those measurements on the other side. Pin and sew. |
 |
| Now, try it on. It should look great on you, because it's actually made for your body! If there is anything that doesn't look right, don't be afraid to make some changes. When you are satisfied, cut off the excess fabric that you've sewn up and press the seams and darts. Sew on the waistband, and button, then, bask in the glory of your accomplishment. |
Thanks for reading and happy sewing!


No comments:
Post a Comment